Pantry Sketchbooks
Tanya and Jill you're going to love this idea and all my friends who repurpose materials in their artwork!
This is an idea I have been thinking and working on for a few years now and I am ready to share it with you! My love for making books started about the year 2000 when I took a book-making workshop in college and ever since I have always loved making my own books. Over the years I have made a few, but always wanted to find a simplier way to bind the book. (Actually, I wanted to make simple books for my children to carry around and doodle in.) One day I was throwing away another cereal box and came up with this very simple and very fun idea....
Step 1: Finish any cereal, popcorn or crackers inside the box. Open ALL flaps of the box, including flaps that have been glued.
Step 2: ***When flattening the box, push left side of box to the front. This is important because that fold is the hinge to open and close the book.
Step 3: Trim small flaps on top and bottom of pantry box and discard. (I haven't figured out what to do with these small pieces just yet!)
Step 4: ****Cut along front right corner to completely open the box.
Step 5: If you are using a large box you can simply cut the box in halves or thirds to get more than one book out of a single pantry box. (You would need to cut horizontally for multiple books from one box).
After you have determined the size of your book, it would be easiest at this step to paint or collage the entire front and inside in any style you wish!
Step 6: Lightly sanding the colored portions may help the paint adhere, but if you are going to completely obsure the surface with several layers, it may not be necessary. I begin by putting a coat or two of gesso on the front and inside of the cover. This gives your cover an almost blank surface to apply a fresh color of acrylic paint or if I want to simply smudge out some of the marketing on the original box. At this point, you could lightly sand the gesso down in various spots to give it visual interest and then jump to step 8.
Step 7: Once the gesso is dry, I apply and spread acrylic paint in random directions. For this step, I use a thick bristled brush where the brushstrokes are visible through the paint surface. I also use various other recycled materials to stamp for a textured effect. (stamps- may be next tutorial!)
Some Examples
Front and Back Cover
Materials used: Acrylic paint and colored pencils
Inside Cover
Materials used: Acrylic paint and sharpie pens

Front and Back Cover
Materials used: acrylic paint, colored pencils and sharpie pens

Inside Cover
Once you have decorated the surface as you wish and you have allowed for drying time, it is time to assemble your pantry sketchbook.
Step 8: Determine size of the papers for the inside. I tend to "eyeball" leaving about 1/8 of an inch of space on all sides, depending on where your holes are in the hinge of the book. This helps ensure your book will close nice and neat. (The paper will be slightly smaller than the book cover).
Step 9: Once you have determined your paper size and how many (I put about 20 sheets of regular copy paper inside), you can put binder clips on 3 or 4 sides of the book to hold the cover and papers firmly in place. Do not place the binders where you plan for the holes on the book.
Another idea is to place your scrap papers or other recycled papers inside your pantry sketchbook, instead of blank copy pages. Other insert ideas; large watercolor paper cut down to make several inserts, cut up pantry boxes to make them actual inserts not just the cover, mixed media papers, wax paper, stiff fabrics, or a mix of whatever you can find!
You need to decide both functionally and aesthetically where to place your holes to bind the cover with the loose blank paper inside your pantry sketchbook.
When deciding placement of holes, the center is probably best.
Step 10: Once you have marked the hole placements, drill holes all the way through (front cover, inside papers and back cover). I use a cordless drill with about an 1/8 of an inch drill bit.
Remember to use all necessary safety gear with powertools.
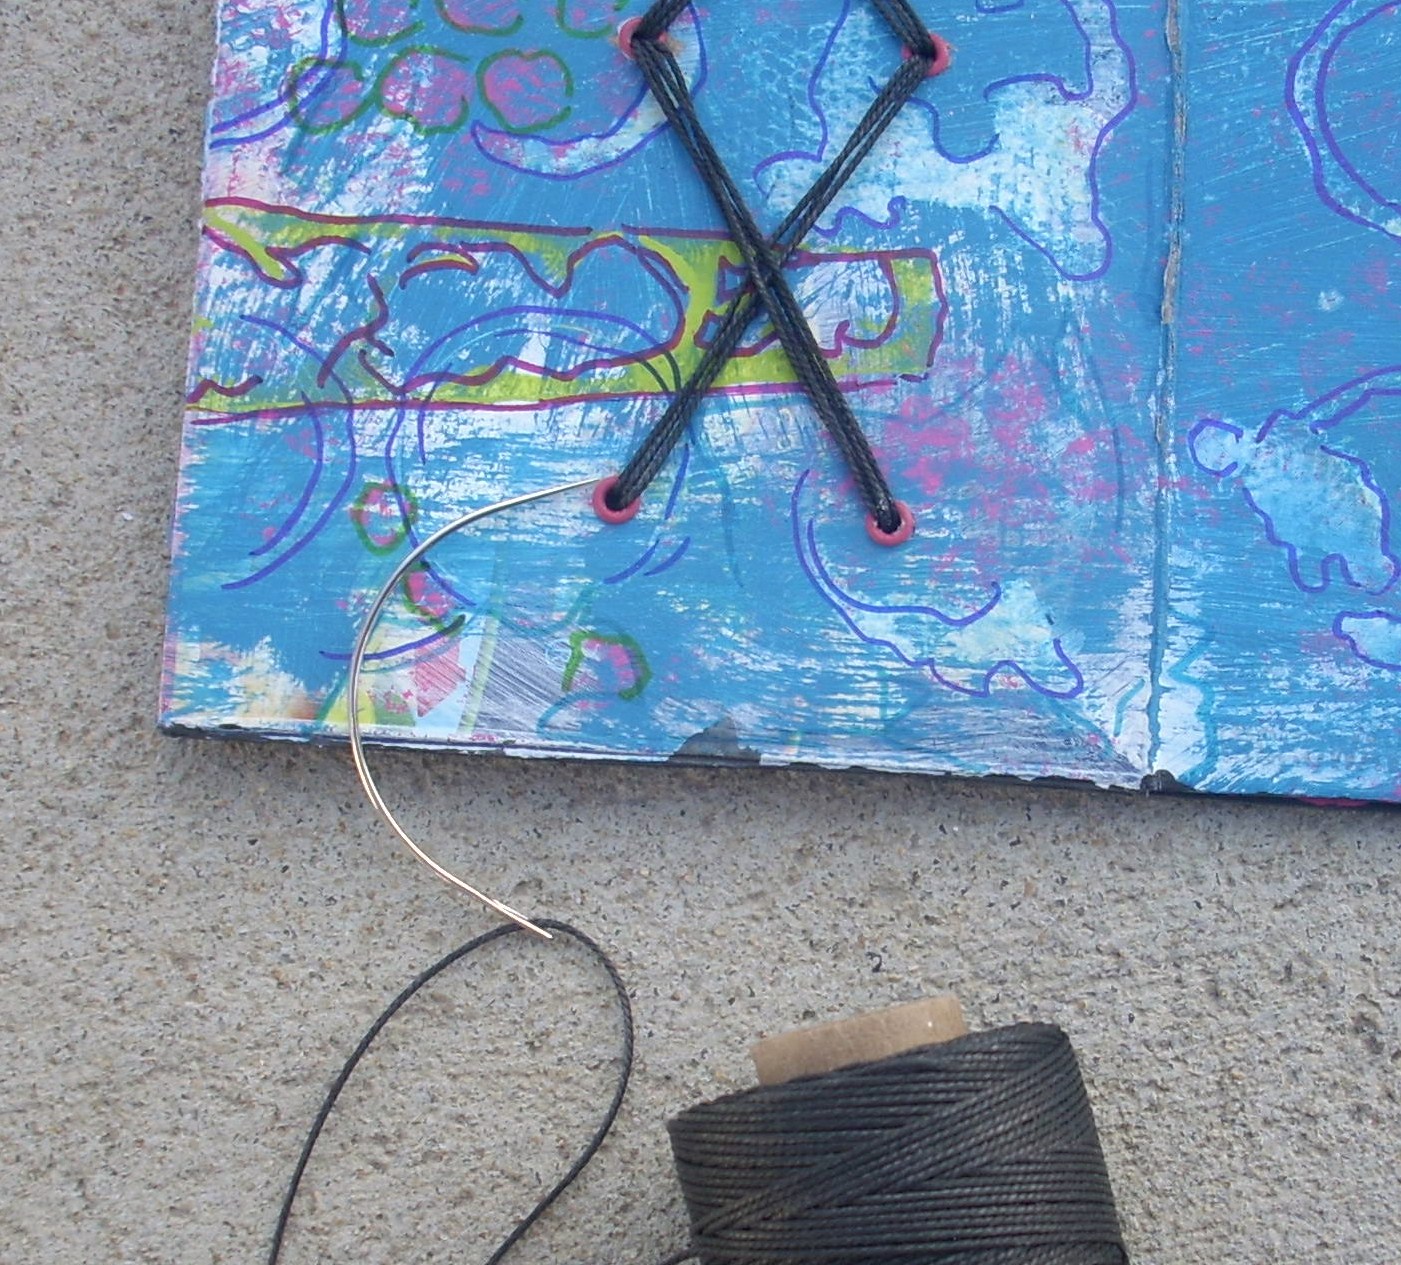
After I drilled holes through this sketchbook, I glued eyelets inside the holes to finish off the look of my book (on the front side only). After the adhesive has dryed, I used a large curved needle and twine to bound this book. Simply threading from one hole to another and keeping the twine taunt throughout threading in each respective hole. This process depends on how many holes you drill through your book.
If you drill 2 holes, one on top of the other, go through the bottom hole first (front to back) leaving a large tail and come back up through the top hole. Do this as many times as you can get the twine through the holes. End on top and secure with a square knot, until you feel it's secure enough to hold your papers in place for use.
After I am satisified with the tightness of the binding, it is time to finish off the twine. (On this particular book, I finished off the twine on the back cover, see photo below). The location of finishing off your twine, yarn, wire or string (whatever binding material you choose) is personal perference! It may look nice on the front cover, tied off with beads attached.
Finished pantry sketchbook front
(I finished off the edges of this book with black paint)
Finished pantry sketchbook inside page 1-
ready for ideas!
Finished pantry sketchbook back showing twine finished off.
There you have it! Pantry sketchbooks!!
Materials needed: recycles boxes from your pantry, scissors, rotary cutter optional, gesso or white paint, acrylic paints, pens, colored pencils or crayons optional, cordless drill or something to puncture thick materials , binder clips or something to hold materials firmly, eyelets optional, material to bind with such as thick yarn, strong string, wire, twine, fun fur, other fun yarns, curved needle, beads or found objects to adorn optional.
This is only the beginning with this idea! It's a great way to make a quick sketchbook and recycle in one. It's also a great activity to do with kids!
Hope you try it!!!
Clearing out my pantry on this artist holiday-
hannah


